My Strategy For Organizing Digital Art Files
I’m a data hoarder. For years I’ve saved almost every art file I’ve made on my computer. At one point my file management system was non-existent and I eventually had to confront the mess and put a better system in place. In this post I’d like to share how I manage my art files.
This post will cover these pillars of file management: grouping, naming, backups, and long-term storage.
Grouping
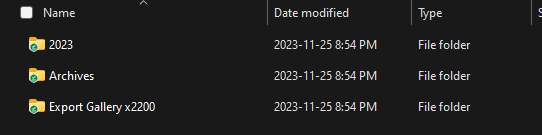
Inside my master folder.
While many artists prefer to organize their files by theme or subject, I like seeing everything in chronological order. Here is an overview of my folder structure:
- Master Folder: This folder contains all of my creative and art-related files.
- Current Year: Within the master folder, I create a folder for each year to store my raw files for that year.
- Archives: Once a year is over, I compress the year folder and store it in the archives. This helps maintain a clean and streamlined workspace while still preserving easy access to older files.
- Export Gallery: To showcase my work and make it easily shareable, I maintain a folder within the master folder specifically for low-resolution jpeg versions of each drawing I export. The x1200 stands for everything in this gallery being 1200 px in width.
Naming
Within my year folder, I keep all of my raw work files without further sub-categorization. However, I follow a loose naming convention to ensure organization and easy sorting. Each file is named in the following format: ‘YYYYMMDD_CATEGORY_SUBJECT_MOOD_STATUS’.
- Date: Each file name always starts with the date formatted as YYYYMMDD. This allows for chronological sorting, ensuring a structured timeline of my drawings.
- Category: I include a brief description of the broad type of art the file represents. For example: illustration, commission, portrait, concept, sketch, fanart, etc.
- Subject: This section provides a description of what the drawing depicts. It includes details such as character names, animals, objects, actions, or any immediate traits that are relevant.
- Mood: I use this section to indicate the intended mood of the drawing.
- Status: This section is exclusively used to label a drawing as a work in progress (WIP).
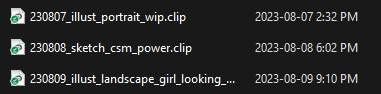
Example of my naming convention in my 2023 folder.
By following this naming convention, I can easily search, sort, and locate specific drawings based on their content instead of vague naming. Your file name isn’t crucial since you’ll typically browse via thumbnail, but this naming method makes it easy to search your drawings when you have a lot of them.
This is the barebones structure I use for storing all of my drawings. Create folders for individual projects within the year folder if needed. This is particularly useful for complex projects that require version management, independent reference management, and storage of client communication. I don’t, because I like keeping it simple, less is more!
Backups
I use an external hard drive to store my drawings and Google Drive Desktop to back them up to the cloud. I have Google One, which is a subscription I pay $20/year for a 100GB cloud drive; no extra effort is needed. Six years of drawings takes roughly 40gb of storage space. Using an external hard drive also gives me the freedom to unplug and move my entire library of work directly into any computer and get right back into work!
I got curious how much you can store with the free 15gb of google drive you get. You can read about it here.
I export every raw file into the Export Gallery for organized storage and quick access to drawings. This helps me save space, since I can later compress my raw files and keep small versions for sharing and viewing. I only export full resolution images when the project requires it and delete them afterward; usually, I save everything as low-res JPGs. There is no reason to have piles of full resolution pngs on your computer. If you need full-resolution PNGs, create a separate Export Gallery for them. Keep only what you need in it, and clear out the folder regularly.
Long Term Storage

Every year, I compress my year folder and store it in the archives for storage. Compressing files is an effective method to free up space and stay organized. Since JPGs are relatively small, I don’t archive my export files; I just keep my RAW files. I prefer 7zip for compression. It’s open source and user-friendly. To compress, right-click the folder, select More Options, select 7zip, and Add to Archive. I use these settings for maximum storage saving.

Compressing files can be time-consuming, depending on your hardware. If you experience problems compressing, reduce the dictionary size to 64MB. After compression, always double-check the file by attempting to extract a file. Although zip corruption is rare, check to be sure. Once everything looks good, delete the original folder and add the compressed .7z file to your archives.
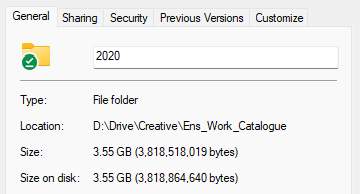
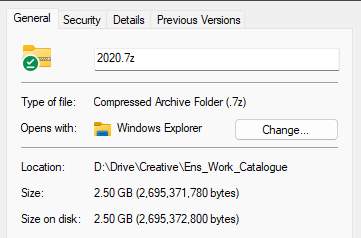
Here is my 2020 folder before compression and after compression. 29.58% saved!
Conclusion
That’s my system for now. I’ve got some very wacky ideas involving file tagging, and an automatically publishing masonry boards, but I don’t plan on dipping my toes into that just yet. The simpler my system is, the easier it is for me to use. Hopefully this gave you some ideas as to how you can develop your own system to managing your art.
Happy creating.